爬虫 selenium
【一】介绍
【1】说明
-
Selenium是一款广泛应用于Web应用程序测试的自动化测试框架
- 它可以模拟用户再浏览器上的行为
- 对Web应用进行自动化测试
-
主要作用:
- 浏览器控制:启动、切换、关闭不同浏览器
- 元素定位于操作:通过CSS选择器、Xpath等定位方式定位元素位置
- 网页操作和内容获取:打开、刷新网页、获取URL、获取网页源码、截图、元素定位
- 测试功能:测试Web应用程序的功能和性能,例如测试表单验证、等待Ajax请求完成操作
- 测试兼容性:测试应用程序是否能很好的运行在不同浏览器、不同操作系统上
【2】安装引入
- 安装
pip install selenium
【3】驱动下载
- win11自带浏览器是microsoft edge
- 这是官网驱动下载地址
- https://developer.microsoft.com/en-us/microsoft-edge/tools/webdriver/
- 根据浏览器版本进行驱动下载
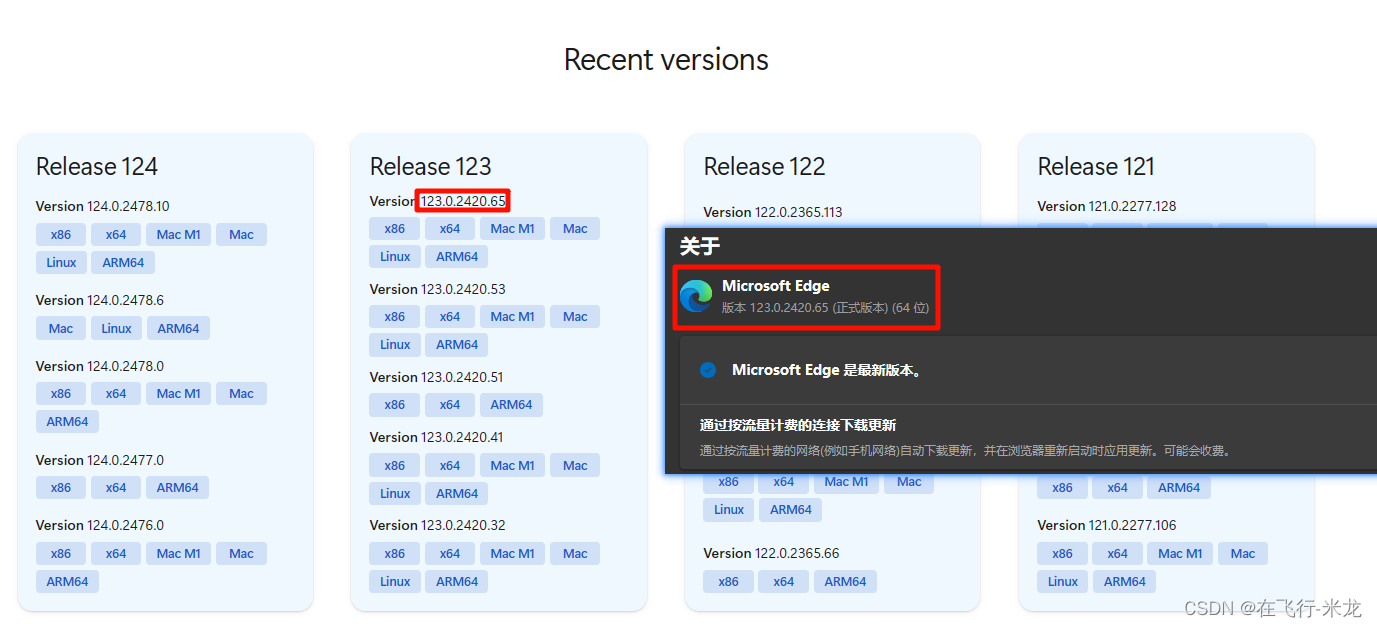
- chrome驱动下载地址
- Chrome for Testing availability (googlechromelabs.github.io)
【4】简单示例
import os
import time
from selenium import webdriver
from selenium.webdriver.edge.service import Service

# 驱动位置
browser_path = os.path.join(os.path.dirname(__file__), 'msedgedriver.exe')
# 需要使用Service对象传递位置,要不然第一运行程序很慢,要等待查找
ser = Service(browser_path)
# 根据驱动选和浏览器进行选择
browser = webdriver.Edge(service=ser)

# 打开网页
browser.get("http://www.baidu.com")
# 等待10秒
time.sleep(10)
# 关闭浏览器
browser.quit()
【二】浏览器操作
【1】基础操作
(1)指定驱动
- 需要使用Service对象指定驱动位置
- 要不然第一运行程序很慢
- 要等待查找程序慢慢查找
from selenium.webdriver.edge.service import Service
# 驱动位置
browser_path = os.path.join(os.path.dirname(__file__), 'msedgedriver.exe')
# 需要使用Service对象指定驱动位置
ser = Service(browser_path)
# 根据驱动选和浏览器进行选择
browser = webdriver.Edge(service=ser)
(2)基础操作
- 常用
- browser.get(url):访问指定网址
- browser.maximize_window():最大化浏览器
- browser.current_url:浏览器当前网址
- browser.page_source:网页源码
- browser.close():关闭当前窗口
- browser.quit():关闭浏览器实例
- 窗口(选项卡):
- browser.window_handles:所有选项卡列表,每个都是24位字符串
- browser.execute_script(“window.open();”):打开一个新的选项卡
- browser.switch_to.window(browser.window_handles[-1]):切换选项卡,切换到最新打开的选项卡
- 其他
- browser.set_window_size(width, height):设置浏览器大小(宽, 高)
- browser.forward():浏览器前进
- browser.forward():浏览器前进
- browser.title:浏览器标题
- browser.name:浏览器名称
(3)八大选择器
- 需要导入标签定位工具
from selenium.webdriver.common.by import By
- browser.find_element(By.ID, value)
- 通过ID查找
- browser.find_element(By.NAME, value)
- 通过Name属性查找
- browser.find_element(By.CLASS_NAME, value)
- 通过class属性查找
- browser.find_element(By.TAG_NAME, value)
- 通过标签名查找
- browser.find_element(By.LINK_TEXT, value)
- 通过链接(a标签)文字进行精确定位
- browser.find_element(By.PARTIAL_LINK_TEXT, value)
- 通过链接(a标签)文字进行模糊定位
- browser.find_element(By.XPATH, value)
- 通过XPath表达式进行定位
- browser.find_element(By.CSS_SELECTOR, value)
- 通过css选择器定位
(4)元素操作
-
首先通过选择器拿到元素
-
tag =  browser.find_element(By.选择器, value)
tag =  browser.find_elements(By.选择器, value)
-
-
常用
- tag.text:获取标签的文本内容
- tag.get_attribute(key):根据属性名获取属性值
- tag.click():对标签进行点击操作
- tag.clear():清空可输入标签内的数据
- tag.send_keys(data):向标签(input、textarea … …)内输入数据
- tag.submit():对标签进行提交操作
- tag.screenshot(‘1.png’):对标签元素进行截图
-
其他:
- tag.id:selenium内部使用的id
- tag.get_property(key):不是所有的 WebDriver 都支持,推荐使用get_attribute(key)
- tag.location:获取坐标位置{‘x’: 630, ‘y’: 2121}
- tag.location_once_scrolled_into_view:滚动页面到指定元素的位置,底部对齐,可输出坐标位置还是字典格式
- tag.size:元素的大小{‘height’: 36, ‘width’: 80}
- tag.tag_name:获取标签的标签名
- tag.is_selected():判断元素是否被选中
- tag.is_enabled():判断元素是否可编辑
- tag.is_displayed:判断元素是否演示
- tag._upload(filename):上传文件
- tag.value_of_css_property(‘color):获取的属性值,这个就是获取颜色属性rgba(57, 81, 179, 1)
【2】页面等待
(1)为什么要等待
- 放置频率过高,对别人的服务器不好
- 等待页面的标签元素加载
(2)等待的方法
-
强制等待(无条件等待)
- 使用time模块中的sleep方法
-
隐式等待
- 通过browser.implicitly_wait(time_to_wait=2)
- 设置的是WebDriver在整个会话期间等待元素加载到dom的时间,全局的配置
- 超过指定时间任然未找到将报错
-
显示等待(智能等待)
-
针对指定元素指定等待时间
-
from selenium.webdriver.common.by import By from selenium.webdriver.support.ui import WebDriverWait from selenium.webdriver.support import expected_conditions as EC # 等待元素出现 wait = WebDriverWait(browser, 10, 0.5) wait.until(EC.presence_of_element_located((By.ID, 'id_value'))) -
WebDriverWait(浏览器, 等待时间, 查找频率(默认0.5s))
-
超出时间也会报错
-
【3】动作链
(1)什么是动作链
-
动作链是一种用于模拟复杂用户交互操作的功能
- 鼠标、键盘操作等
-
导入动作链类ActionChains
from selenium.webdriver.common.action_chains import ActionChains
- 导入键盘类Keys
from selenium.webdriver.common.keys import Keys
(2)常用鼠标、键盘操作
- 鼠标(鼠标操作最后一定要perform)
- context_click():右击
- double_click():双击
- double_and_drop():拖拽
- move_to_element():悬停
- perform():执行
- 键盘(键盘操作可以直接使用)
- send_keys(Keys.BACK_SPACE):删除键
- send_keys(Keys.SPACE):空格键
- send_keys(Keys.TAB):制表键
- send_keys(Keys.ESCAPE):回退键
- send_keys(Keys.ENTER):回车键
- send_keys(Keys.CONTROL, ‘a’):全选
- send_keys(Keys.CONTROL, ‘c’):复制
- send_keys(Keys.CONTROL, ‘v’):粘贴
- send_keys(Keys.CONTROL, ‘x’):剪切
- send_keys(Keys.F1):键盘F1
- 事件监听
- click(on_element=None) :左键点击
- click_and_hold(on_element=None) :单击左键不松开
- context_click(on_element=None):右键点击
- double_click(on_element=None):双击左键
- drag_and_drop(source,target):拖拽某个元素
- drag_and_drop_by_offset(source,xoffset,yoffset):拖拽并移动指定像素
- key_down(value,element=None):按下某个键盘
- key_up(value, element=None):松开键盘上的某个键
- move_by_offset(xoffset, yoffset):移动指定像素
- move_to_element(to_element):移动到指定元素
- move_to_element_with_offset(to_element, xoffset, yoffset):移动到指定元素的位置(距元素左上角)
- pause(seconds):暂停所有输入,指定时间
- perform():执行所有操作
- reset_action():结束已经存在的操作并重置
- release(on_element=None):在某个元素位置松开鼠标
- send_keys(*keys_to_send):发送某个键或文本到当前焦点的元素
- send_keys_to_element(element, *keys_to_send):发送某个键或文本到指定元素
【4】动作链示例
(1)搜狗输入
- 实际上不用动作链更方便,这里为了演示
import time

from selenium import webdriver
from selenium.webdriver.edge.service import Service
from selenium.webdriver.common.by import By
from selenium.webdriver.common.action_chains import ActionChains
from selenium.webdriver.common.keys import Keys

service = Service('.\msedgedriver.exe')
browser = webdriver.Edge(service=service)

browser.get("https://www.sogou.com/")
browser.maximize_window()
time.sleep(1)

# 创建动态链实例
action = ActionChains(browser)
# 找到输入文本框
input_elm = browser.find_element(By.XPATH, '//*[@id="query"]')
input_elm.send_keys("周润发")  # 输入文本
# 搜索按钮
search_ele = browser.find_element(By.XPATH, '//*[@id="stb"]')
action.move_to_element(search_ele).click().perform()  # 必须要perform

# 等待3s
time.sleep(3)

# 从新找到输入文本框
input_elm = browser.find_element(By.XPATH, '//*[@id="upquery"]')
# input_elm.clear() # 简单直接
input_elm.send_keys(Keys.CONTROL, "a")  # 复杂
time.sleep(0.5)
input_elm.send_keys(Keys.BACK_SPACE)
time.sleep(0.5)
input_elm.send_keys('周星驰')
time.sleep(0.5)

# 搜索按钮
search_ele = browser.find_element(By.XPATH, '//*[@id="searchBtn"]')
action.click(search_ele).perform() # 一定要perform

time.sleep(2)
browser.close()
browser.quit()
(2)拖拽标签滑动
- 测试网址:http://sahitest.com/demo/dragDropMooTools.htm
import time

from selenium import webdriver
from selenium.webdriver.edge.service import Service
from selenium.webdriver.common.by import By
from selenium.webdriver.common.action_chains import ActionChains
from selenium.webdriver.common.keys import Keys

service = Service('.\msedgedriver.exe')
browser = webdriver.Edge(service=service)

browser.get('http://sahitest.com/demo/dragDropMooTools.htm')
browser.maximize_window()
time.sleep(1)

# 获取元素
source_div = browser.find_element(By.XPATH, '//*[@id="dragger"]')
target_div1 = browser.find_element(By.XPATH, "/html/body/div[2]")
target_div2 = browser.find_element(By.XPATH, "/html/body/div[3]")
target_div3 = browser.find_element(By.XPATH, "/html/body/div[4]")
target_div4 = browser.find_element(By.XPATH, "/html/body/div[5]")

# 实例化动作链
action = ActionChains(browser)
# 拖拽方式一: 直接drag_and_drop
time.sleep(1)
action.drag_and_drop(source_div, target_div1).perform()
# 拖拽方式二:先click_and_hold,然后move_to_element,再然后release
time.sleep(1)
action.click_and_hold(source_div).move_to_element(target_div2).release().perform()
# 拖拽方式三:先计算偏移量,然后drag_and_drop_by_offset
time.sleep(1)
x = target_div3.location['x'] - source_div.location['x']
y = target_div3.location['y'] - source_div.location['y']
action.drag_and_drop_by_offset(source_div, x, y).perform()
# 拖拽方式四:先click_and_hold,然后到目标位置release
time.sleep(1)
action.click_and_hold(source_div).release(target_div4).perform()

time.sleep(2)
browser.close()
browser.quit()
(3)框架(frame)内拖动标签
- 测试网址:菜鸟教程在线编辑器 (runoob.com)
- 无法直接操作
- 需要先切换到指定框架内
import random
import time

import selenium.common.exceptions
from selenium import webdriver
from selenium.webdriver.edge.service import Service
from selenium.webdriver.common.by import By
from selenium.webdriver.common.action_chains import ActionChains
from selenium.webdriver.common.keys import Keys

service = Service('.\msedgedriver.exe')
browser = webdriver.Edge(service=service)
browser.maximize_window()

browser.get('https://www.runoob.com/try/try.php?filename=jqueryui-api-droppable')
time.sleep(2)

# 根据frame的id进行切换
browser.switch_to.frame('iframeResult')
# 获取元素标签
source_div = browser.find_element(By.XPATH, '//*[@id="draggable"]')
target_div = browser.find_element(By.XPATH, '//*[@id="droppable"]')
# 实例动作链对象
action = ActionChains(browser)
# 计算需要移动的偏移量
x = target_div.location['x'] - source_div.location['x']
try:
    while x:
        m = min(random.randint(1, x), 30)
        action.drag_and_drop_by_offset(source_div, m, 0).perform()
        x -= m
        time.sleep(random.randint(50, 150) / 1000)
except selenium.common.exceptions.UnexpectedAlertPresentException:
    pass

time.sleep(2)
browser.close()
browser.quit()
【5】执行JS代码
(1)需求何来
- 前端显示受限
- 页面滚动条无法通过元素获取
- 通过执行JS代码,甚至还可以修改页面参数
(2)使用方法
- 打开新的页面
browser.execute_script("window.open()")
browser.switch_to.window(browser.window_handles[-1])
browser.get("http://baidu.com")
- 滚动到页面底部
browser.execute_script("window.scrollTo(0, document.body.scrollHeight)")
- 点击元素
next_url = browser.find_element(By.XPATH, '//*[@id="sogou_next"]')
script_str = 'arguments[0].click()'
browser.execute_script(script_str, next_url)
- 输入文本
input_div = browser.find_element(By.XPATH, '//*[@id="upquery"]')
script_str = 'arguments[0].value = arguments[1]'
browser.execute_script(script_str, input_div, '周杰伦')
- 获取元素属性
element = browser.find_element(By.XPATH, '//*[@id="searchBtn"]')
script_str = 'return arguments[0].getAttribute("value");'
attribute_value = browser.execute_script(script_str, element)
print(attribute_value)  # 搜狗搜索
- 拖动元素
- 速度过快,还是使用动作链
source_div = browser.find_element(By.XPATH, '')
target_div = browser.find_element(By.XPATH, '')
script_str = '''
    var source = arguments[0], target = arguments[1];
    var offsetX = target.getBoundingClientRect().left - source.getBoundingClientRect().left;
    var offsetY = target.getBoundingClientRect().top - source.getBoundingClientRect().top;
    var event = new MouseEvent('mousedown', { bubbles: true, cancelable: true, view: window });
    source.dispatchEvent(event);
    event = new MouseEvent('mousemove', { bubbles: true, cancelable: true, view: window, clientX: offsetX, clientY: offsetY });
    source.dispatchEvent(event);
    event = new MouseEvent('mouseup', { bubbles: true, cancelable: true, view: window });
    source.dispatchEvent(event);
'''
browser.execute_script(script_str, source_div, target_div)
- 隐藏或伪装浏览器自动化
browser.execute_script("Object.defineProperties(navigator,{webdriver:{get:()=>undefined}})")
【6】options
(1)介绍
- 无头浏览器是一种没有图形界面(GUI)的的网络浏览器
- 他通过在内存中渲染页面,然后将结果发送回请求它的用户或程序来实现对网络的访问,而不会在屏幕上显示网页
- 优点
- 执行速度快、减少干扰、资源消耗低、易于集成、应用范围广
- 缺点
- 不能完全模拟用户真实行为、不适用于需要页面渲染验证的场景、调试困难
(2)页面渲染机制
- 解析HTML,构建DOM树
- 解析CSS,生成CSSOM树
- 合并DOM树和CSSOM树,生成渲染树
- 根据渲染树进行布局
- 调用GPU绘制渲染树,合并图层,显示在屏幕上
- 无头浏览器跳过了后面的三个步骤
(2)如何使用
- 无头浏览器有时还是需要指定窗口大小的
- 模拟不同设备大小
- 网页渲染需要
- 截图一致性
from selenium.webdriver.edge.options import Options
options = Options()
# 指定窗口分辨率
options.add_argument("window-size=1920x1080")
# 隐藏滚动条,应对特殊界面
options.add_argument('--hide-scrollbars')
# 启用无头浏览器
options.add_argument('--headless')
# 不加载图片,提升速度
options.add_argument('blink-settings=imagesEnabled=false')
# 禁用GPU加速
options.add_argument('--disable-gpu')
# 添加IP代理 proxy=f"http://{ip}:{port}"
options.add_argument(f'--proxy-server={proxy}')
# 隐身模式(无痕模式)
options.add_argument('--incognito')
# 设置请求头的User-Agent
options.add_argument('--user-agent=""')
# 浏览器最大化
options.add_argument('--start-maximized')
# 设置中文
options.add_argument('lang=zh_CN.UTF-8')
- 去除自动化控制的设置
options.add_experimental_option("excludeSwitches", ["enable-automation"])
options.add_experimental_option('useAutomationExtension', False)
- 示例
- 百度可以
- 搜狗不行
import time
from selenium import webdriver
from selenium.webdriver.edge.service import Service
from selenium.webdriver.common.by import By
from selenium.webdriver.edge.options import Options
from selenium.webdriver.support.ui import WebDriverWait
from selenium.webdriver.support import expected_conditions as EC

edge_options = Options()
# 指定窗口分辨率
edge_options.add_argument("window-size=1920x1080")
# 隐藏滚动条,应对特殊界面
edge_options.add_argument('--hide-scrollbars')
# 启用无头浏览器
edge_options.add_argument('--headless')
# 不加载图片,提升速度
edge_options.add_argument('blink-settings=imagesEnabled=false')
# 规避bug
edge_options.add_argument('--disable-gpu')

service = Service('.\msedgedriver.exe')
browser = webdriver.Edge(service=service, options=edge_options)
browser.maximize_window()

browser.get('https://www.baidu.com/')
time.sleep(2)

element = WebDriverWait(browser, 10).until(EC.element_to_be_clickable((By.XPATH, '//*[@id="su"]')))
script_str = 'return arguments[0].getAttribute("value");'
attribute_value = browser.execute_script(script_str, element)
print(attribute_value)  # 百度一下

time.sleep(1)
browser.close()
browser.quit()
【7】cookie操作
(1)常用方法
- browser.get_cookies():获取当前页面cookies,是列表套字典
- browser.add_cookie(cookie_dict):添加cookie
- browser.delete_cookies(name):根据name删除指定cookie
- browser.delete_all_cookies():删除所有的cookie
(2)查看add_cookie源码注释
"""
Adds a cookie to your current session.

:Args:
 - cookie_dict: A dictionary object, with required keys - "name" and "value";
    optional keys - "path", "domain", "secure", "httpOnly", "expiry", "sameSite"

:Usage:
    ::
        driver.add_cookie({'name' : 'foo', 'value' : 'bar'})
        driver.add_cookie({'name' : 'foo', 'value' : 'bar', 'path' : '/'})
        driver.add_cookie({'name' : 'foo', 'value' : 'bar', 'path' : '/', 'secure' : True})
        driver.add_cookie({'name' : 'foo', 'value' : 'bar', 'sameSite' : 'Strict'})
"""
- cookie_dict以字典的形式传入
- 字典中必须有name和value两个键
- 可选的键有:“path”, “domain”, “secure”, “httpOnly”, “expiry”, “sameSite”
- 键名的含义
- name:cookie的名称。唯一标识符,区分不同的cookie
- value:cookie对应的值
- domain:cookie适用的域名。定义哪些域名可以接收和发送cookie
- expiry或max-age:cookie的过期时间
- path:cookie适用的URL路径
- httpOnly:一个标识,指示cookie是否只能通过HTTP(S)协议访问,而不能通过客户端脚本(如javascript)访问
- secure:一个标识,指示cookie是否只能通过安全的HTTPS连接传输
- sameSite:定义cookie的sameSite属性,控制何时发送cookie,有助于放置跨站请求伪造(csrf)攻击,有三个值
- Strict:仅当请求来自同一站点才发送cookie
- Lax:在导航到目标站点(即链接点击)或顶级导航到相同站点时发送cookie
- None:浏览器始终发送cookie,不考虑请求的站点。
- 这通常和Secure属性一起使用,以增强安全性
(3)使用方法
# 保存cookies
cookies = browser.get_cookies()
with open(cookie_path, 'wt', encoding='utf8') as fp:
	json.dump(cookies, fp=fp)
# 添加cookie
with open(cookie_path, 'rt', encoding='utf8') as fp:
	cookies = json.load(fp=fp)
for cookie in cookies:
	browser.add_cookie(cookie)
# 转为requets中的cookies字典
with open(cookie_path, 'rt', encoding='utf8') as fp:
	cookies = json.load(fp=fp)
requests_cookies = {cookie.get('name'):cookie.get('value') for cookie in cookies}
# 转换为headers中的cookie
from urllib.parse import quote  # 用于编码cookie的名称和值
with open(cookie_path, 'rt', encoding='utf8') as fp:
	cookies = json.load(fp=fp)
headers_cookie = "; ".join([f"{quote(cookie['name'])}={quote(cookie['value'])}" for cookie in cookies])






![每日一题 第八十九期 洛谷 [NOIP2017 提高组] 奶酪](https://img-blog.csdnimg.cn/img_convert/777f20c5e49ef89859242f442ee432a1.png)
