线程同步
- 一.什么是线程同步
- 二.线程同步的方法
- 1.互斥锁
- (1)什么是互斥锁
- (2)互斥锁的接口
- (3)互斥锁的使用(例题)
- 2.信号量
- (1)什么是信号量
- (2)信号量的接口
- (3)信号量的使用(例题)
- a.循环打印ABC
- b.:主线程获取用户输入,函数线程将用户输入的数据存储到文件中;
- 3.读写锁
- (1)读写锁的接口
- (2)读写锁的使用
- 4.条件变量
- (1)什么是条件变量
- (2)条件变量的接口
- (3)条件变量的使用(例题)
一.什么是线程同步
一个进程中的所有线程共享同一个地址空间和诸如打开的文件之类的其他资源.一个线程对资源的任何修改都会影响同一个进程中其他线程的环境.因此,需要同步各种线程的活动,以便它们互不干涉且不破坏数据结构.例如,如果两个线程都试图同时往一个双向链表中增加一个元素,则可能会丢失一个元素或者破坏链表结构
线程同步指的是当一个线程在对某个临界资源进行操作时,其他线程都不可以对这个资源进行操作,直到线程完成操作, 其他线程才能操作,也就是协同步调,让线程按预定的先后次序进行运行。 线程同步的方法有四种:互斥锁、信号量、条件变量、读写锁。
二.线程同步的方法
1.互斥锁
(1)什么是互斥锁

(2)互斥锁的接口
int pthread_mutex_init(pthread_mutex_t *mutex,pthread_mutexattr_t *attr);//attr:锁的属性,不需要传空即可
int pthread_mutex_lock(pthread_mutex_t *mutex);
int pthread_mutex_unlock(pthread_mutex_t *mutex);
int pthread_mutex_destroy(pthread_mutex_t *mutex);
//注意,互斥锁mutex都需要传地址,因为要改变它;
(3)互斥锁的使用(例题)
示例代码如下,函数线程1和函数线程2模拟访问打印机,函数线程1输出第一个字符‘ A’表示开始使用打印机,输出第二个字符‘ A’表示结束使用,函数线程2操作与函数线程1相同。(由于打印机同一时刻只能被一个线程使用,所以输出结果不应该出现 abab)
代码:
#include<stdio.h>
#include<unistd.h>
#include<string.h>
#include<assert.h>
#include<pthread.h>
#include<stdlib.h>

pthread_mutex_t mutex;

void* fun1(void *arg)
{
    for(int i=0;i<5;i++)
    {
        pthread_mutex_lock(&mutex);//可能阻塞
        printf("A");
        fflush(stdout);
        int n=rand()%3;
        sleep(n);
        printf("A");
        fflush(stdout);
        pthread_mutex_unlock(&mutex);//解锁
        n=rand()%3;
        sleep(n);
    }
}


void* fun2(void *arg)
{
    for(int i=0;i<5;i++)
    {
        pthread_mutex_lock(&mutex);//加锁
        printf("B");
        fflush(stdout);
        int n=rand()%3;
        sleep(n);
        printf("B");
        fflush(stdout);
        pthread_mutex_unlock(&mutex);//解锁
        n=rand()%3;
        sleep(n);
    }
}

int main()
{
    pthread_mutex_init(&mutex,NULL);
    pthread_t id1,id2;
    pthread_create(&id1,NULL,fun1,NULL);
    pthread_create(&id2,NULL,fun2,NULL);

    pthread_join(id1,NULL);
    pthread_join(id2,NULL);
    pthread_mutex_destroy(&mutex);
    exit(0);
}
运行结果截图:

2.信号量
(1)什么是信号量
信号量
(2)信号量的接口
int sem_init(sem_t *sem, int pshared, unsigned int value);//信号量的初始化
//sem_init()在sem指向的地址初始化未命名的信号量。这个value参数指定信号量的
初始值(第三个参数)。
//pshared:设置信号量是否在进程间共享,Linux不支持,一般给0; (非0为共享)
int sem_wait(sem_t *sem);//P操作,wait表示等待,相当于是等待获取资源,那么就是P操作
int sem_post(sem_t *sem);//V操作
int sem_destroy(sem_t *sem);/销毁信号量
(3)信号量的使用(例题)
a.循环打印ABC
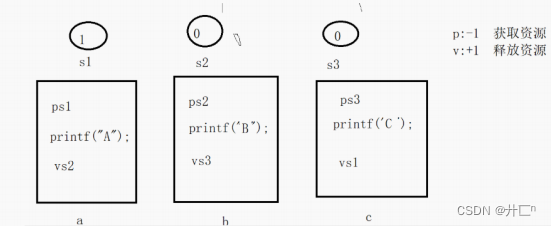
代码:
#include<stdio.h>
#include<unistd.h>
#include<stdlib.h>
#include<pthread.h>
#include<string.h>
#include<semaphore.h>


sem_t sema;
sem_t semb;
sem_t semc;

void *funa(void *arg)
{
    for(int i=0;i<5;i++)
    {
        sem_wait(&sema);//ps1
        printf("A");
        fflush(stdout);
        sem_post(&semb);//vs2
    }
}
void *funb(void *arg)
{
    for(int i=0;i<5;i++)
    {
        sem_wait(&semb);//ps2
        printf("B");
        fflush(stdout);
        sem_post(&semc);//vs3
    }
}

void *func(void *arg)
{
    for(int i=0;i<5;i++)
    {
        sem_wait(&semc);//ps3
        printf("C");
        fflush(stdout);
        sem_post(&sema);//vs1
    }
}
int main()
{
    sem_init(&sema,0,1);
    sem_init(&semb,0,0);
    sem_init(&semc,0,0);

    pthread_t id1,id2,id3;
    pthread_create(&id1,NULL,funa,NULL);
    pthread_create(&id2,NULL,funb,NULL);
    pthread_create(&id3,NULL,func,NULL);

    pthread_join(id1,NULL);
    pthread_join(id2,NULL);
    pthread_join(id3,NULL);

    sem_destroy(&sema);
    sem_destroy(&semb);
    sem_destroy(&semc);

    exit(0);
}
运行结果截图:

b.:主线程获取用户输入,函数线程将用户输入的数据存储到文件中;
代码:
#include<stdio.h>
#include<stdlib.h>
#include<assert.h>
#include<unistd.h>
#include<pthread.h>
#include<semaphore.h>
#include<fcntl.h>
#include<string.h>

sem_t sem1;
sem_t sem2;

char buff[128]={0};

void  funa()
{
    while(1)
    {
        sem_wait(&sem1);
        printf("please input data:");
        fflush(stdout);

        fgets(buff,128,stdin);
        buff[strlen(buff)-1]=0;

        sem_post(&sem2);

        if(strncmp(buff,"end",3)==0)
        {
            break;
        }
    }
}


void *funb(void*arg)
{
    int fd=open("a.txt",O_RDWR|O_CREAT,0664);
    assert(fd!=-1);

    while(1)
    {
        sem_wait(&sem2);
        if(strncmp(buff,"end",3)==0)
        {
            break;
        }
        write(fd,buff,strlen(buff));
        memset(buff,0,128);
        sem_post(&sem1);
    }
    sem_destroy(&sem1);
    sem_destroy(&sem2);
}

int main()
{
    sem_init(&sem1,0,1);
    sem_init(&sem2,0,0);

    pthread_t id;
    int res=pthread_create(&id,NULL,funb,NULL);
    assert(res==0);

    funa();

    pthread_exit(NULL);
}
运行结果截图:
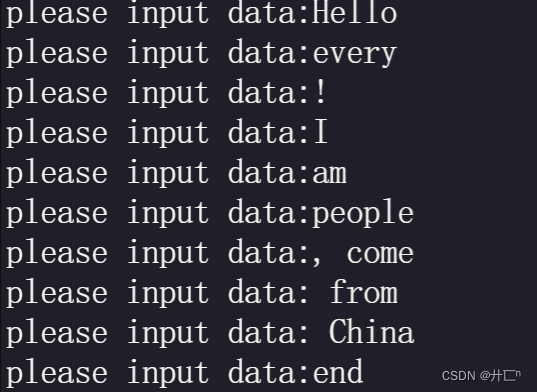
a.txt

3.读写锁
(1)读写锁的接口
#include <pthread.h>
int pthread_rwlock_init(pthread_rwlock_t*rwlock,pthread_rwlockattr_t *attr);
//第一个参数是锁的地址,第二个参数是锁的属性
int pthread_rwlock_rdlock(pthread_rwlock_t *rwlock);//加读锁
int pthread_rwlock_wrlock(pthread_rwlock_t *rwlock);//加写锁
int pthread_rwlock_unlock(pthread_rwlock_t *rwlock);//解锁,不管加的是读锁还是写锁,都用unlock解锁
int pthread_rwlock_destroy(pthread_rwlock_t *rwlock);//销毁
(2)读写锁的使用
代码
#include<stdio.h>
#include<unistd.h>
#include<string.h>
#include<assert.h>
#include<pthread.h>
#include<stdlib.h>

pthread_rwlock_t lock;

void* fun1(void *arg)
{
    for(int i=0;i<10;i++)
    {
        pthread_rwlock_rdlock(&lock);
        printf("fun1 read start---\n");
        sleep(1);
        printf("fun1 read end---\n");
        pthread_rwlock_unlock(&lock);
        sleep(1);
    }
}

void* fun2(void *arg)
{
    for(int i=0;i<5;i++)
    {
        pthread_rwlock_rdlock(&lock);
        printf("fun2 read start---\n");
        sleep(2);
        printf("fun2 read end---\n");
        pthread_rwlock_unlock(&lock);
    }
}
void* fun3(void *arg)
{
    for(int i=0;i<3;i++)
    {
        pthread_rwlock_wrlock(&lock);
        printf("fun3 write start***********\n");
        sleep(3);
        printf("fun3 write end************\n");
        pthread_rwlock_unlock(&lock);

    }
}
int main()
{
    pthread_rwlock_init(&lock,NULL);
    pthread_t id1,id2,id3;
    pthread_create(&id1,NULL,fun1,NULL);
    pthread_create(&id2,NULL,fun2,NULL);
    pthread_create(&id3,NULL,fun3,NULL);

    pthread_join(id1,NULL);
    pthread_join(id2,NULL);
    pthread_join(id3,NULL);

    pthread_rwlock_destroy(&lock);
    exit(0);
}
运行结果截图:
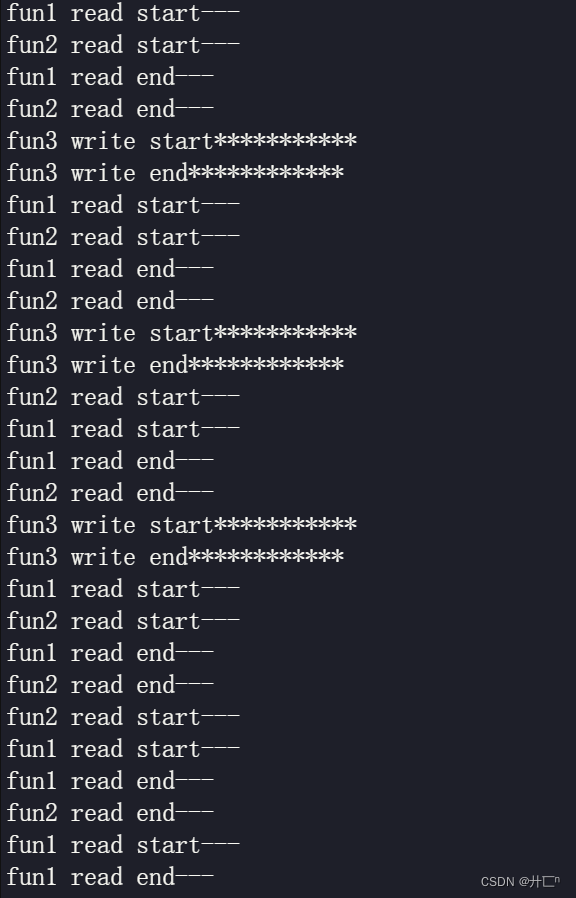
4.条件变量
(1)什么是条件变量
如果说互斥锁是用于同步线程对共享数据的访问的话,那么条件变量则是用于在线程之间的同步共享数据的值.条件变量提供了一种线程间的通知机制:当某个共享数据达到某个值的时候,唤醒等待这个共享数据的线程.
(2)条件变量的接口
#include <pthread.h>
int pthread_cond_init(pthread_cond_t *cond, pthread_condattr_t *attr);
int pthread_cond_wait(pthread_cond_t *cond, pthread_mutex_t *mutex);
//将条件变量添加到等待队列中,阻塞,等待被唤醒;第一个参数是条件变量的地址,第二个参数是互斥锁;
//也就是说条件变量往往伴随着互斥锁的使用;
int pthread_cond_signal(pthread_cond_t *cond); //唤醒单个线程
int pthread_cond_broadcast(pthread_cond_t *cond); //唤醒所有等待的线程
int pthread_cond_destroy(pthread_cond_t *cond);//销毁条件变量
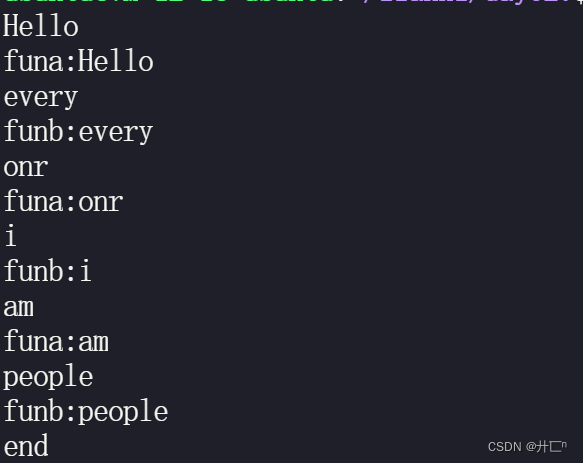
(3)条件变量的使用(例题)
#include<stdio.h>
#include<unistd.h>
#include<stdlib.h>
#include<string.h>
#include<pthread.h>

pthread_mutex_t mutex;
pthread_cond_t cond;

void *funa(void*arg)
{
    char *s=(char*)arg;
    while(1)
    {
        pthread_mutex_lock(&mutex);
        pthread_cond_wait(&cond,&mutex);
        pthread_mutex_unlock(&mutex);


        if(strncmp(s,"end",3)==0)
        {
            break;
        }
        printf("funa:%s",s);
    }


}
void*funb(void*arg)
{
    char *s=(char*)arg;
    while(1)
    {
        pthread_mutex_lock(&mutex);
        pthread_cond_wait(&cond,&mutex);
        pthread_mutex_unlock(&mutex);

        if(strncmp(s,"end",3)==0)
        {
            break;
        }
        printf("funb:%s",s);
    }
}

int main()
{
    pthread_mutex_init(&mutex,NULL);
    pthread_cond_init(&cond,NULL);

    char buff[128]={0};
    pthread_t id1,id2;
    pthread_create(&id1,NULL,funa,(void*)buff);
    pthread_create(&id2,NULL,funb,(void*)buff);


    while(1)
    {
        fgets(buff,128,stdin);
        if(strncmp(buff,"end",3)==0)
        {
            //唤醒所有线程
            pthread_cond_broadcast(&cond);
            break;
        }
        else
        {
            //唤醒一个线程
            pthread_cond_signal(&cond);
        }
    }
    pthread_join(id1,NULL);
    pthread_join(id2,NULL);
    pthread_mutex_destroy(&mutex);
    pthread_cond_destroy(&cond);
    exit(0);
}
